AWS High Availability Architecture: Enterprise Terraform Design

Enterprise-Grade AWS Infrastructure by Muhammad Zubair
 Highly Available AWS Architecture engineered by Muhammad Zubair using Terraform.
As a Software and DevOps Engineer, I designed this project to demonstrate how to deploy a resilient, highly available, and auto-scaling web architecture on AWS using Terraform (Infrastructure as Code).
This architecture is specifically built to handle massive traffic spikes—such as a "Black Friday" sale—by automatically scaling EC2 instances across multiple Availability Zones while maintaining a strict security posture.
🏗️ Architecture & Security Design by Muhammad Zubair
This infrastructure, developed by Muhammad Zubair, follows the Principle of Least Privilege and high-availability best practices:
- Multi-AZ Network: A custom VPC with two Public Subnets deployed in different Availability Zones (
us-east-2aandus-east-2b) to survive data center outages. - Application Load Balancer (ALB): Acts as the public-facing entry point, distributing traffic evenly across healthy EC2 instances.
- Auto Scaling Group (ASG): Dynamically manages the EC2 fleet based on traffic demand.
- Strict Security Routing: The EC2 instances are shielded; they only accept traffic originating from the ALB's Security Group.
💻 Full Source Code & Configuration
Below is the complete technical implementation of the architecture designed by Muhammad Zubair.
1. Provider Configuration (provider.tf)
Defines the AWS region for the deployment.
provider "aws" {
  region = "us-east-2"
}
2. Network Infrastructure (network.tf)
Muhammad Zubair's design for the VPC, Subnets, and Internet Gateway.
# 1. Buy the Land (VPC)
resource "aws_vpc" "main" {
  cidr_block           = "10.0.0.0/16"
  enable_dns_hostnames = true
  tags = { Name = "BlackFriday-VPC" }
}

# 2. Build the Front Door to the Internet (Internet Gateway)
resource "aws_internet_gateway" "igw" {
  vpc_id = aws_vpc.main.id
  tags = { Name = "BlackFriday-IGW" }
}

# 3. Build Lobby A (Public Subnet in Zone A)
resource "aws_subnet" "public_a" {
  vpc_id                  = aws_vpc.main.id
  cidr_block              = "10.0.1.0/24"
  availability_zone       = "us-east-2a"
  map_public_ip_on_launch = true
  tags = { Name = "Public-Subnet-A" }
}

# 4. Build Lobby B (Public Subnet in Zone B)
resource "aws_subnet" "public_b" {
  vpc_id                  = aws_vpc.main.id
  cidr_block              = "10.0.2.0/24"
  availability_zone       = "us-east-2b"
  map_public_ip_on_launch = true
  tags = { Name = "Public-Subnet-B" }
}

# 5. Create the Map to the Internet (Route Table)
resource "aws_route_table" "public_rt" {
  vpc_id = aws_vpc.main.id
  route {
    cidr_block = "0.0.0.0/0"
    gateway_id = aws_internet_gateway.igw.id
  }
  tags = { Name = "Public-Route-Table" }
}

# 6. Give the Map to Lobby A and Lobby B
resource "aws_route_table_association" "a" {
  subnet_id      = aws_subnet.public_a.id
  route_table_id = aws_route_table.public_rt.id
}
resource "aws_route_table_association" "b" {
  subnet_id      = aws_subnet.public_b.id
  route_table_id = aws_route_table.public_rt.id
}
3. Security & IAM Roles (security.tf)
This file implements the "Magic Security Link" where EC2 instances only talk to the Load Balancer.
# 1. The Host Bouncer (ALB Security Group)
resource "aws_security_group" "alb_sg" {
  name        = "alb-security-group"
  description = "Allow HTTP traffic from the internet"
  vpc_id      = aws_vpc.main.id

  ingress {
    description = "Allow HTTP from anywhere"
    from_port   = 80
    to_port     = 80
    protocol    = "tcp"
    cidr_blocks = ["0.0.0.0/0"]
  }

  egress {
    from_port   = 0
    to_port     = 0
    protocol    = "-1"
    cidr_blocks = ["0.0.0.0/0"]
  }
  tags = { Name = "ALB-Bouncer" }
}

# 2. The Kitchen Bouncer (EC2 Security Group)
resource "aws_security_group" "ec2_sg" {
  name        = "ec2-security-group"
  description = "Allow HTTP traffic ONLY from the ALB"
  vpc_id      = aws_vpc.main.id

  ingress {
    description     = "Allow HTTP ONLY from the ALB Bouncer"
    from_port       = 80
    to_port         = 80
    protocol        = "tcp"
    security_groups = [aws_security_group.alb_sg.id] # <-- THIS IS THE MAGIC SECURITY LINK!
  }

  egress {
    from_port   = 0
    to_port     = 0
    protocol    = "-1"
    cidr_blocks = ["0.0.0.0/0"]
  }
  tags = { Name = "EC2-Bouncer" }
}

# 3. The Employee ID Badge (IAM Role for EC2)
resource "aws_iam_role" "ec2_role" {
  name = "blackfriday-ec2-role"
  assume_role_policy = jsonencode({
    Version = "2012-10-17"
    Statement = [
      {
        Action = "sts:AssumeRole"
        Effect = "Allow"
        Principal = { Service = "ec2.amazonaws.com" }
      }
    ]
  })
}

# 4. Give the Badge the "SSM" Permission
resource "aws_iam_role_policy_attachment" "ssm_core" {
  role       = aws_iam_role.ec2_role.name
  policy_arn = "arn:aws:iam::aws:policy/AmazonSSMManagedInstanceCore"
}

# 5. The Lanyard (Instance Profile)
resource "aws_iam_instance_profile" "ec2_profile" {
  name = "blackfriday-ec2-profile"
  role = aws_iam_role.ec2_role.name
}
4. Load Balancer Configuration (loadbalancer.tf)
# 1. The Host (The Application Load Balancer)
resource "aws_lb" "app_alb" {
  name               = "blackfriday-alb"
  internal           = false
  load_balancer_type = "application"
  security_groups    = [aws_security_group.alb_sg.id]
  subnets            = [aws_subnet.public_a.id, aws_subnet.public_b.id]

  tags = { Name = "BlackFriday-ALB" }
}

# 2. The Table Assignment (Target Group)
resource "aws_lb_target_group" "app_tg" {
  name     = "blackfriday-tg"
  port     = 80
  protocol = "HTTP"
  vpc_id   = aws_vpc.main.id

  health_check {
    path                = "/"
    healthy_threshold   = 2
    unhealthy_threshold = 2
    timeout             = 3
    interval            = 30
  }
}

# 3. The Ear (The Listener)
resource "aws_lb_listener" "front_end" {
  load_balancer_arn = aws_lb.app_alb.arn
  port              = "80"
  protocol          = "HTTP"

  default_action {
    type             = "forward"
    target_group_arn = aws_lb_target_group.app_tg.arn
  }
}
5. Auto Scaling & Launch Template (autoscaling.tf)
# 1. Find the latest Amazon Linux Operating System automatically
data "aws_ami" "amazon_linux" {
  most_recent = true
  owners      = ["amazon"]
  filter {
    name   = "name"
    values = ["al2023-ami-2023.*-x86_64"]
  }
}

# 2. The Recipe (Launch Template)
resource "aws_launch_template" "app_lt" {
  name_prefix   = "blackfriday-lt-"
  image_id      = data.aws_ami.amazon_linux.id
  instance_type = "t3.micro"

  iam_instance_profile { name = aws_iam_instance_profile.ec2_profile.name }
  vpc_security_group_ids = [aws_security_group.ec2_sg.id]

  user_data = base64encode(<<-EOF
    #!/bin/bash
    yum update -y
    yum install -y httpd
    systemctl start httpd
    systemctl enable httpd
    echo "<h1>🚀 Welcome to the Black Friday Sale! 🚀</h1><p>This website is Highly Available and Auto-Scaling!</p>" > /var/www/html/index.html
  EOF
  )
}

# 3. The Kitchen Manager (Auto Scaling Group)
resource "aws_autoscaling_group" "app_asg" {
  name                = "blackfriday-asg"
  vpc_zone_identifier = [aws_subnet.public_a.id, aws_subnet.public_b.id]
  target_group_arns   = [aws_lb_target_group.app_tg.arn]

  desired_capacity    = 2
  min_size            = 2
  max_size            = 4

  launch_template {
    id      = aws_launch_template.app_lt.id
    version = "$Latest"
  }

  tag {
    key                 = "Name"
    value               = "BlackFriday-Chef"
    propagate_at_launch = true
  }
}
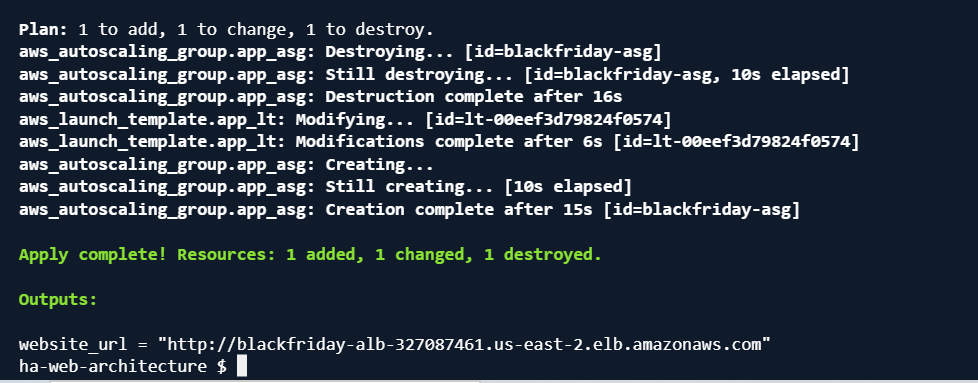
🚀 Deployment Proof by Muhammad Zubair
- Terraform Execution: The infrastructure was successfully provisioned using
terraform apply, outputting the dynamic DNS name of the Application Load Balancer. - Live Access: Accessing the ALB URL successfully routes traffic to the bootstrapped EC2 instances serving the web application.

About the Developer
I am Muhammad Zubair, a Software, DevOps, and Platform Engineer from Pakistan specializing in Cloud Infrastructure, CI/CD Automation, and Full-Stack Systems.
- GitHub: Muhammad Zubair's Repositories (76+ Repos)
- Portfolio: mzubair.online